Front Post Treble Crochet (fptr): Complete Guide + Variations, Charts & Tips
- What is Front Post Treble Crochet (fptr)?
- Where is fptr used?
- Fptr vs fpdc: What’s the difference?
- Fptr placement: 1-3 rows below
- How to crochet fptr (step-by-step tutorial)
- Why you need to skip stitches behind fptr
- How to crochet right-leaning (skipping 2 stitches and working around next stitch) front post treble crochet
- How to crochet left-leaning (worked 2 rows below previous stitch worked) front post treble crochet
- Fptr crochet symbol: How to read front post treble crochet in charts
- Tips and troubleshooting
What is Front Post Treble Crochet (fptr)?
Front post treble crochet (fptr) is a tall post stitch also worked around the post of a stitch instead of into the top two loops. Like fpdc, it brings the stitch forward, creating a raised, dimensional texture. The main difference is that fptr begins with two yarn overs, making it taller and giving it more length to reach across or around stitches when creating textured patterns and crochet cables.
Fptr is another stitch I use very often in my own designs, especially when I need more height or a greater shift than fpdc can comfortably provide. It opens up even more possibilities for creating pronounced lines, crossings, and complex textured designs. So, let’s take a closer look at how to crochet fptr and how to use it correctly.
Where is fptr used?
Fptr is commonly used in crochet to create bold, raised textures and decorative stitch patterns. You will often see it in crochet cables, braids, twists, diagonal lines, textured stitch patterns, and dimensional panels, where the post stitches become an important part of the design.
It can be used in blankets, hats, cowls, scarves, pillows, bags, garments, and accessories — essentially, in any crochet project where you want to add pronounced texture, structure, and visual interest. Fptr is especially common in designs inspired by Aran crochet and crochet cables, where raised stitches form intricate patterns on the surface of the fabric.
Fptr vs fpdc: What’s the difference?
Fptr and fpdc are both front post stitches worked around the post of a stitch from front to back to front. However, they differ not only in height, but also in how far the stitch can comfortably reach across the fabric.
Fpdc (front post double crochet) begins with one yarn over and is a shorter post stitch. In textured patterns, I typically use fpdc around stitches 1–2 rows below and for relatively small shifts — usually about one stitch to the left or right.
Fptr (front post treble crochet) begins with two yarn overs, making it taller and giving it more length and flexibility. This allows fptr to be worked around stitches 1–3 rows below and to reach posts positioned farther away — for example, 2–3 stitches to the left or right of its position in the working row.
This greater range of movement is one of the main reasons I use fptr in more complex textured patterns and crochet cables. While fpdc works beautifully for shorter, more compact movements, fptr gives you more freedom to move stitches vertically and diagonally across the fabric, creating larger crossings, longer diagonal lines, and more complex textured designs.
Fptr placement: 1-3 rows below
Depending on the stitch pattern and the stitches used to create the fabric, fptr can be worked around the post of a stitch from the previous row or as far as 3 rows below. Its extra height allows the stitch to reach deeper into the fabric while still maintaining enough length to sit naturally on the surface.
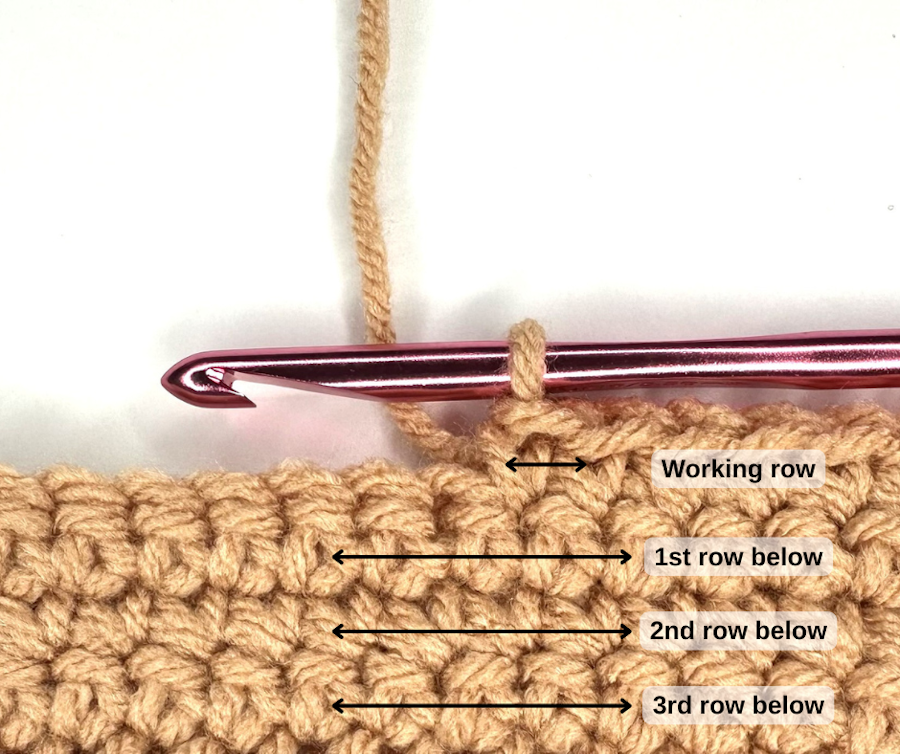
The exact placement depends on the structure of the pattern. When fptr is worked around a stitch farther below, it creates a longer raised line and can be used to connect different areas of the texture or reach posts that would be difficult to reach comfortably with a shorter fpdc.
In my own stitch patterns and crochet patterns, I primarily use sc as the base fabric, so I most often work fptr around a post 2 rows below. I typically choose fptr when I need to reach a stitch that is farther away and fpdc does not provide enough height or length.
For this reason, the step-by-step tutorial below shows how to crochet fptr around a stitch 2 rows below.
How to crochet fptr (step-by-step tutorial)
Follow these steps to crochet fptr:
- Yarn over 2 times
- Insert your hook from front to back to front around the post of the indicated stitch – this can be any type of stitch (sc, hdc, dc, fpdc, fptr)
- Yarn over and pull up a loop (you should have 4 loops on your hook)
- Yarn over, pull through 2 loops twice
- Yarn over, pull through remaining 2 loops.
You have completed one fptr.
Take a moment to notice how the stitch sits on the surface of the fabric — this will help you better understand how fptr behaves in more complex textured patterns and cables.
Why you need to skip stitches behind fptr
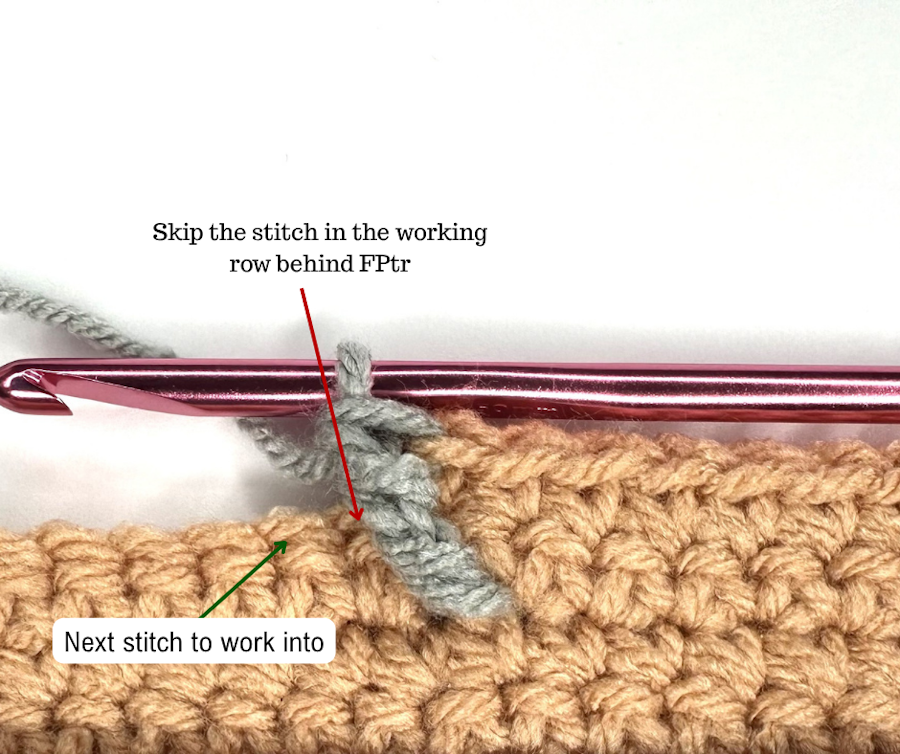
Just like with fpdc, when you work fptr, you need to skip the corresponding stitch in the working row. Even though fptr may reach farther down or across the fabric, it still replaces one stitch in the working row.
The top loops of the stitch behind fptr remain visible, but they should be left unworked unless the pattern specifically instructs otherwise. This keeps your stitch count correct and prevents the fabric from becoming distorted.
The same rule applies whether fptr is worked straight or at an angle: one fptr replaces one stitch in the working row.
If you don’t skip the corresponding stitch, your stitch count will increase and the shape and texture of the fabric may change.
How to crochet left and right-leaning front post treble crochet stitches
In the tutorials below, I’ll show you how to work fptr with a 2-stitch shift to the right and to the left. This is the placement I use most often in my own textured stitch patterns.
Common situations you will see in patterns:
1. How to crochet right-leaning (skipping 2 stitches and working around next stitch) front post treble crochet
The stitch is worked out of order and moves forward, crossing over the skipped space and creating a right-leaning effect
Skip 2 stitches in the working row.
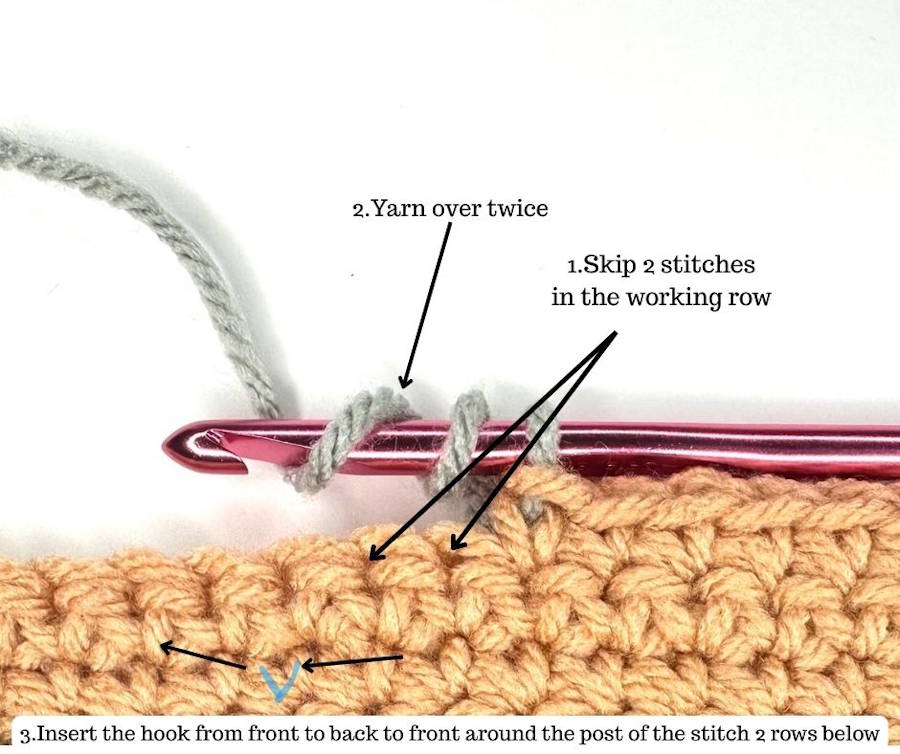
Then insert your hook around the next stitch 2 rows below and work fptr as usual — this can be any type of stitch (sc, hdc, dc, fpdc, fptr)
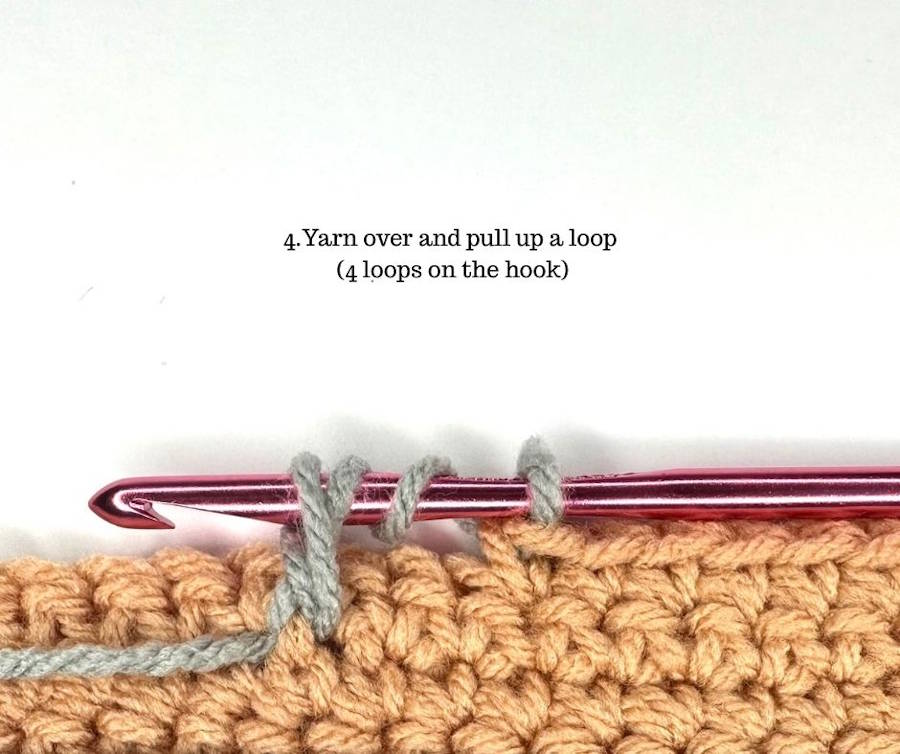
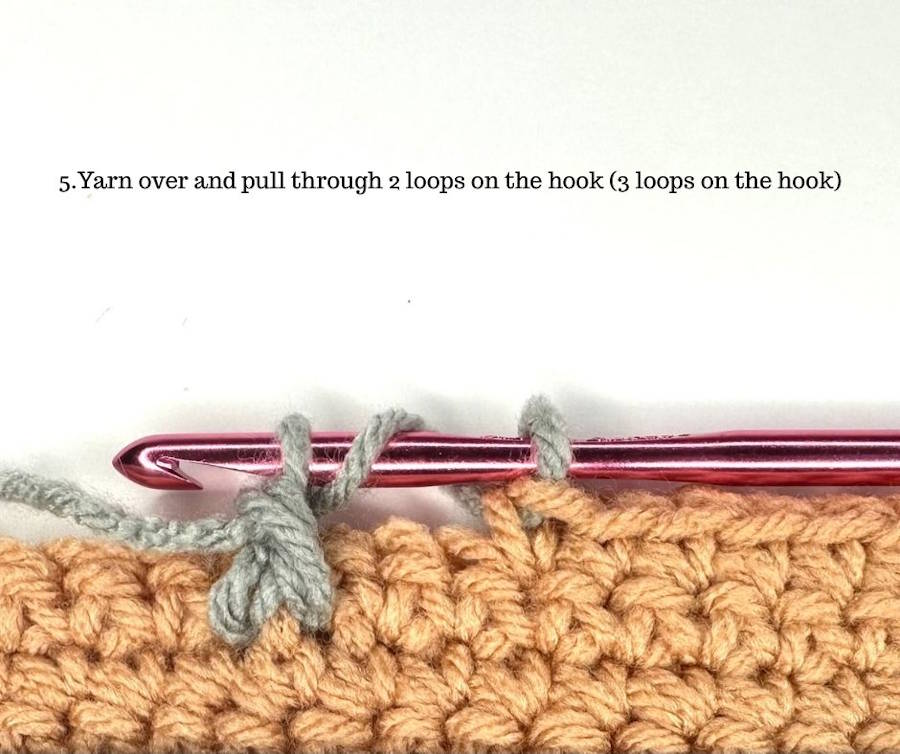
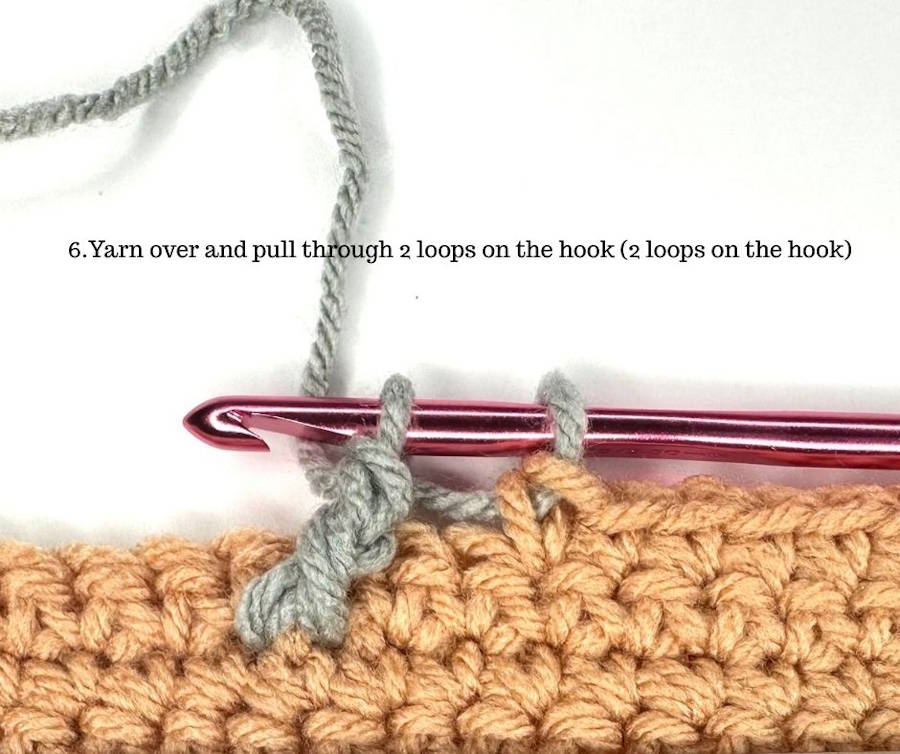
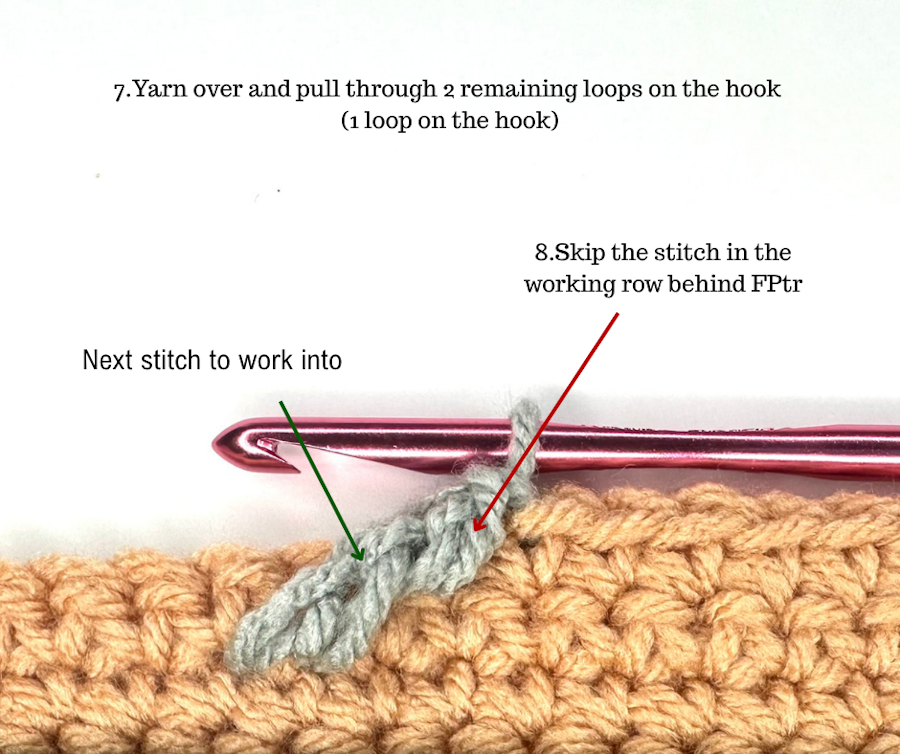
2. How to crochet left-leaning (worked 2 rows below the previous stitch worked) front post treble crochet
The stitch is worked out of order and sits slightly behind, which makes it shift backward in the fabric and creates a left-leaning effect.
Locate the stitch 2 rows below the previous stitch worked – this can be any type of stitch (sc, hdc, dc, fpdc, fptr):
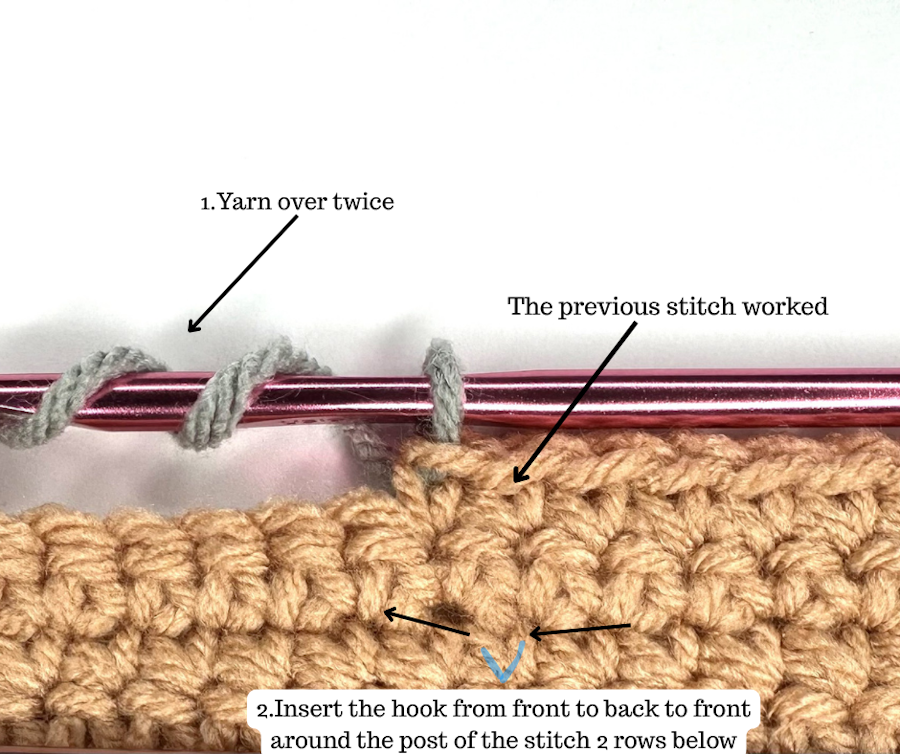
Then insert your hook around its post and work fptr as usual:
Fptr crochet symbol: How to read front post treble crochet in charts
In crochet charts, fptr is represented using a standard symbol from the international crochet chart system.
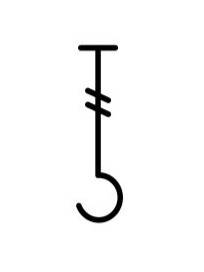
Depending on its position in the chart, the symbol may appear:
- straight
- leaning to the right
- leaning to the left
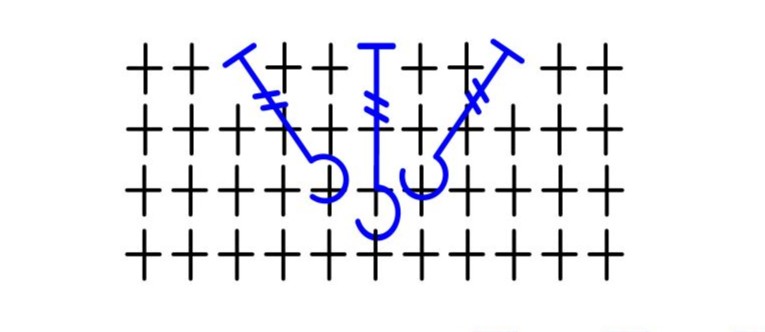
The direction of the symbol indicates how the stitch is worked and how it will appear in the fabric.
Crochet charts also clearly show which stitch the fptr should be worked around, making it easier to understand stitch placement, even in more complex patterns.
Learning to read these symbols will help you quickly recognize how fptr is used and how it shapes the overall texture of the design.
Tips and troubleshooting
Working fptr becomes much easier once you understand how the stitch is constructed. If something feels off, it’s usually related to placement, tension, or stitch order.
Tips for better results
- make sure you are working around the post
- keep your tension slightly relaxed so the hook can move easily around the post
- pull your loops a little higher than usual to add height and prevent the fabric from curling inward
- use lighter yarn colors to clearly see stitch structure
- take a moment to identify the correct stitch before inserting your hook
Fptr is one of my favorite stitches for building larger crossings and expressive textured designs, especially when a shorter post stitch simply can’t create the movement I need. Once you become comfortable with its placement and direction, you can start exploring just how much freedom this stitch gives you when working with crochet texture.
Wishing you many happy stitches and lots of joyful crocheting!